
Calendar
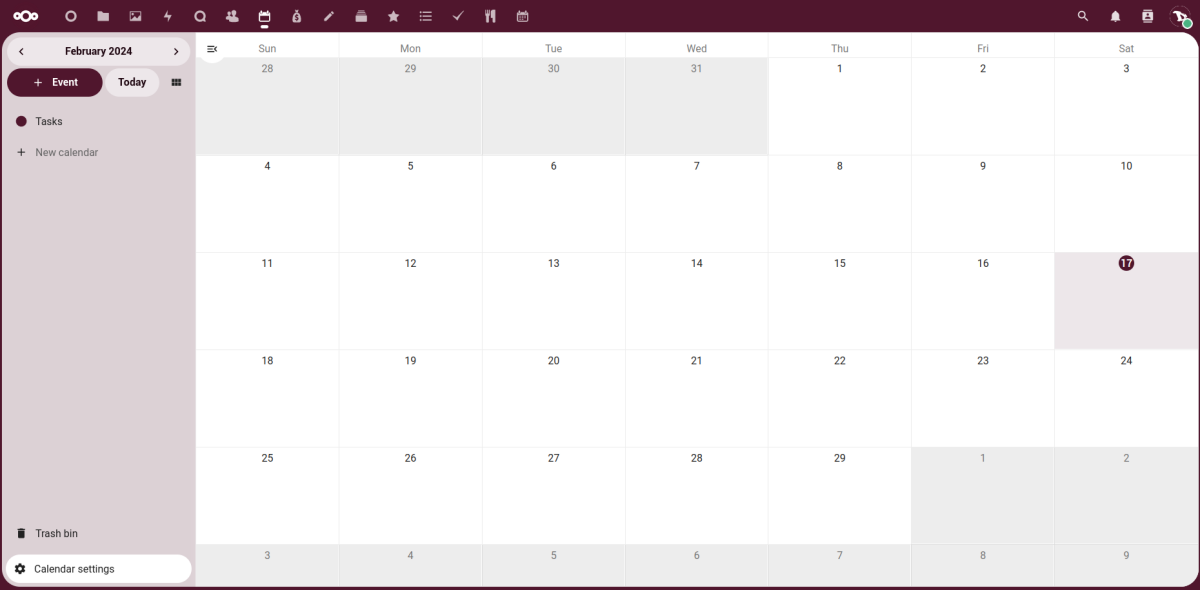
The Calendar app is the user interface for Disroot's CalDAV server. It allows us to sync events from various devices with our Disroot Cloud and edit them online.
Creating a calendar
To create a new calendar we just click on + New calendar and type the name we want to give it. Then press the arrow on the right or just hit Enter in the keyboard.
We can create multiple calendars for different purposes (work, activism, etc.) by repeating this process.
At the bottom of the left panel we have the Trash bin, where the calendars, tasks and events that we delete are stored for a 30 days period, after which those items are automatically and permanently deleted if we do not do it before. And the Calendar settings.
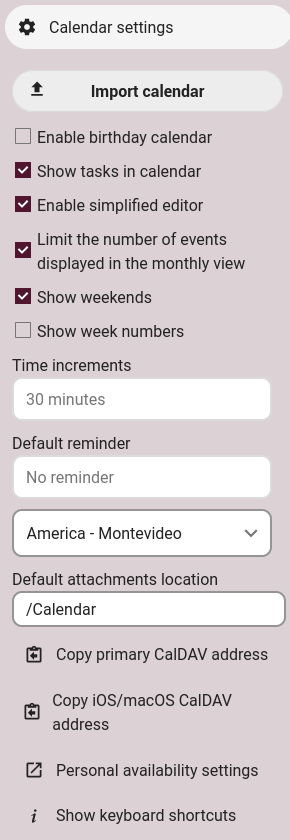
From here we can import a calendar previously saved as an .ics file. We can also enable/disable a number of additional options, copy the CalDAV address and access the availability settings (which we already saw in the Settings chapter)
Enabling the birthday calendar will generate a calendar which automatically fetch the birthdays from our contacts. The only way to edit this calendar is by filling our contacts with birthday dates from the Contacts app.
Creating an event
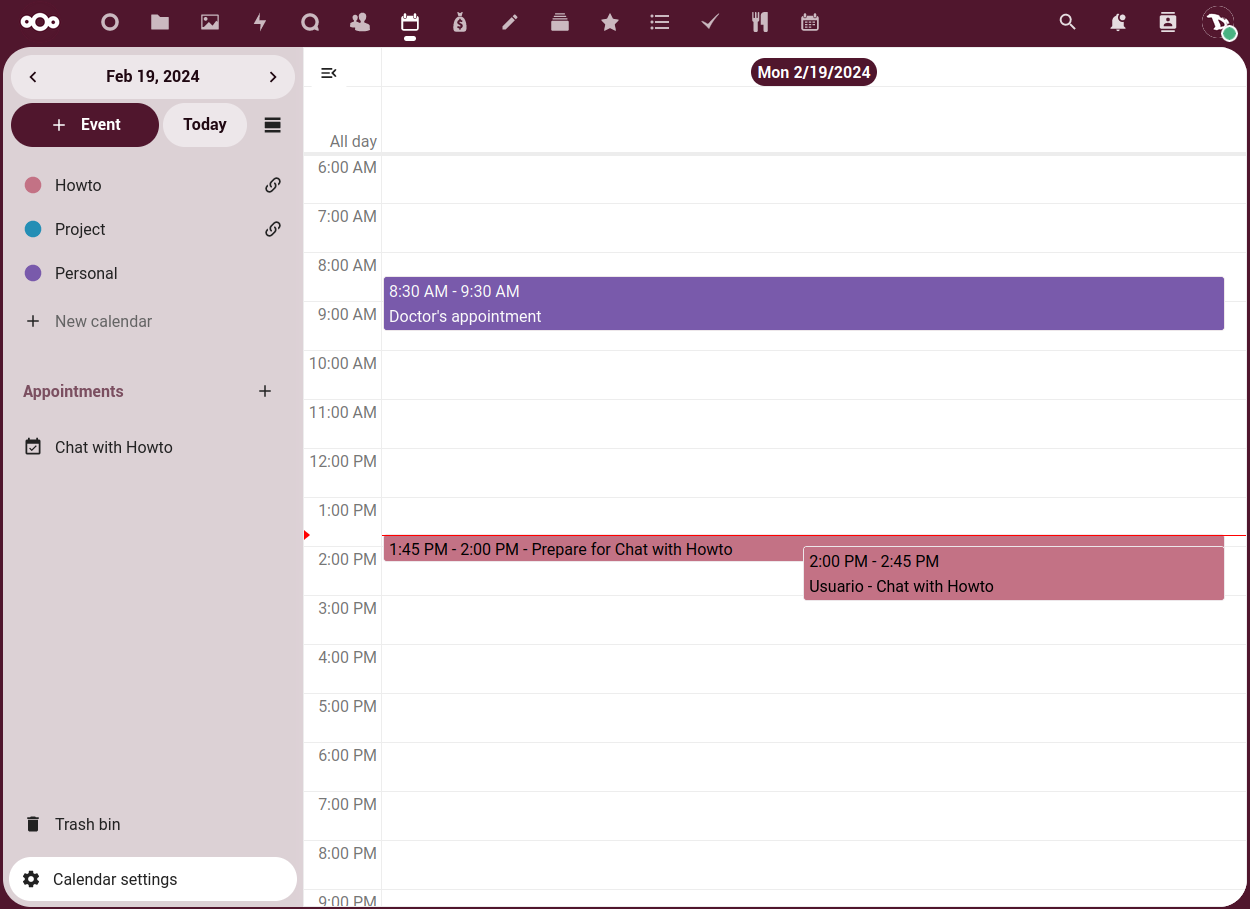
We can create a new event in our calendar by simply clicking on a specific day in the calendar main window. A popup will appear, where we can
- add an event title;
- select to which calendar the event belongs to (in case we have multiple calendars);
- set the start and end date and time or if it is full day event;
- add the event location; and
- add an event description.
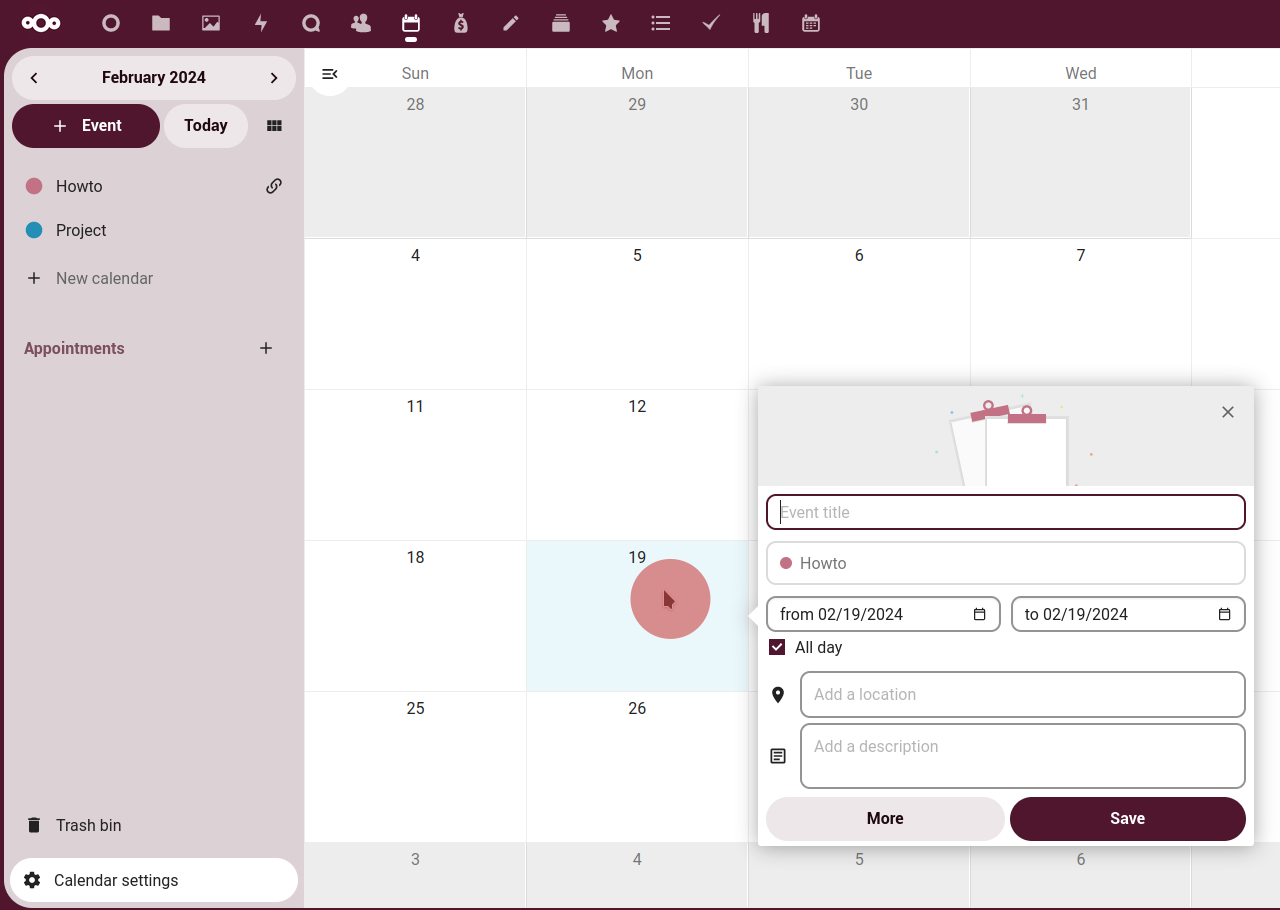
By clicking in the More button we will access to the event options panel.
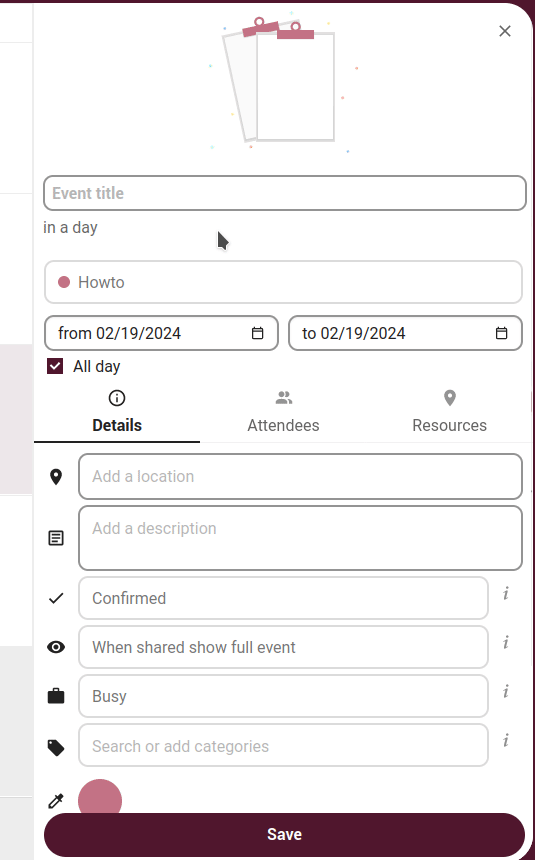
In the Details tab we can:
- specify the event Status (Confirmed, Tentative or Canceled);
-
set the visibility of the event when the calendar is shared;
- Show as busy or free when the event is taken into account in our availability (if we have configured it);
- add a Category to the event;
- set a Color for the event;
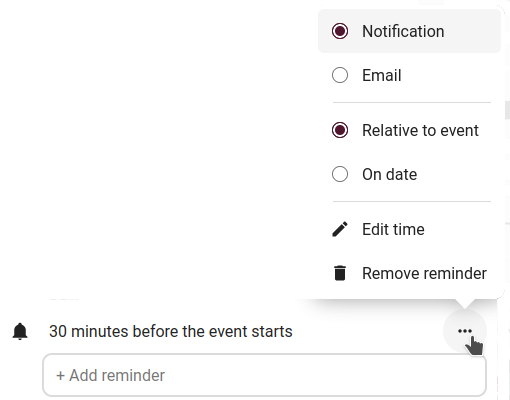
- add a Reminder to be notified before an event. After being set up, we can configure it through the three-dots menu at the right of the reminder;
- we can also set the recurrence or not of an event;
- and attach a file to the event.
-
If we want to export the event as an .ics file, remove it or duplicate it, we can do it from the three-dots menu next to the event title.
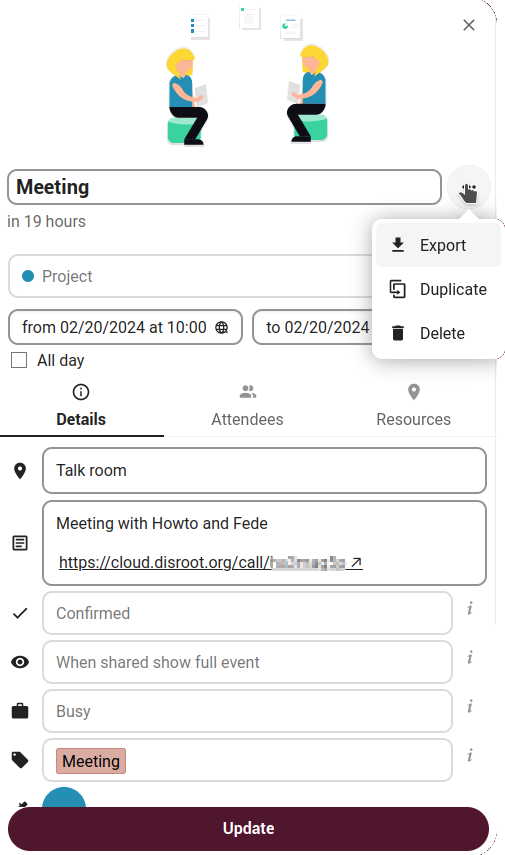
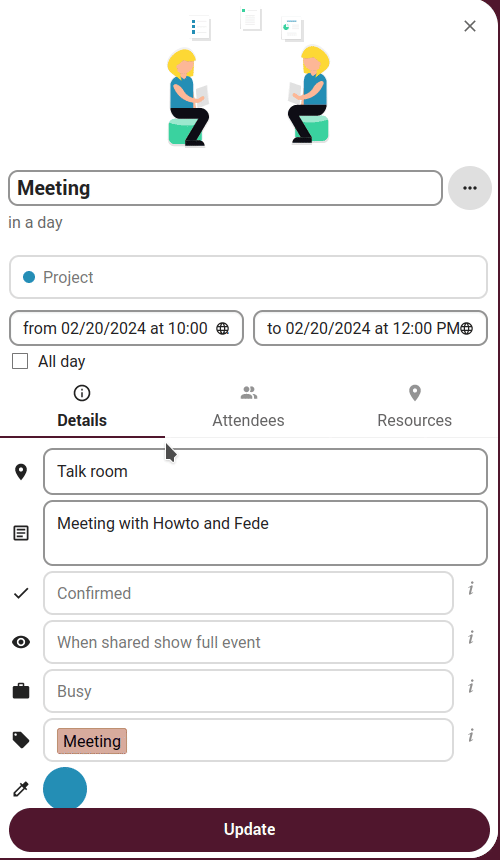
Finally, clicking on the Update button will update the event. To cancel the changes, we click on the close icon on top right of the editor.
Inviting people to an event
From the same options panel we can invite people to an event by clicking on the Attendees tab.
Attendees may be other users on our cloud instance, contacts in our address book or direct email addresses. We can also change the level of participation per attendees, or disable the email information for a specific attendee.
The people we invite will receive an email invitation and will be able to confirm or cancel their participation. If we make any change on the event it will be automatically sent by email to the attendees.
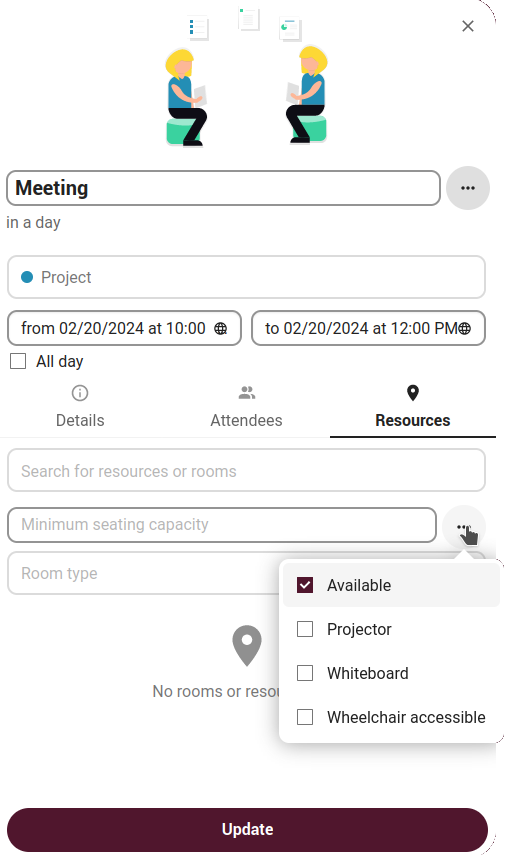
We can also Create a Talk room for the event in this same tab and/or assign Resources in the corresponding tab.
Editing and sharing a calendar
On the left panel, we will see our calendars listed. To the right of each one of them we will find a three-dots button that opens the editing options.
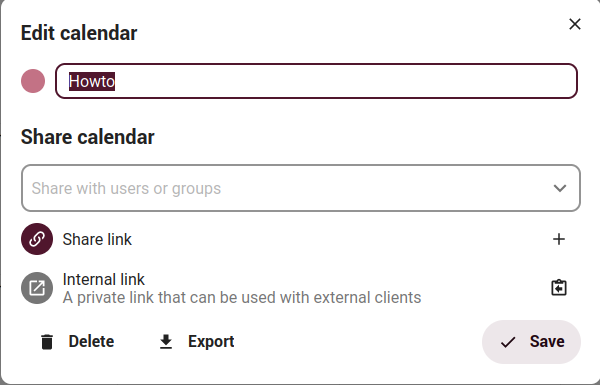
Here we can
- rename the calendar;
- edit its color;
- share it;
- delete it or
- export it.
Sharing calendars
We can share our calendars via a link or with other users or groups and grant them read-only or write permissions.
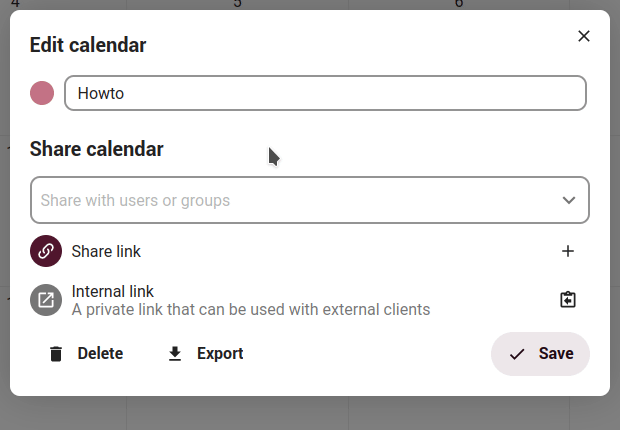
To share a calendar via a public link we click on the pencil icon on the right of the calendar name and the calendar edition options will open.
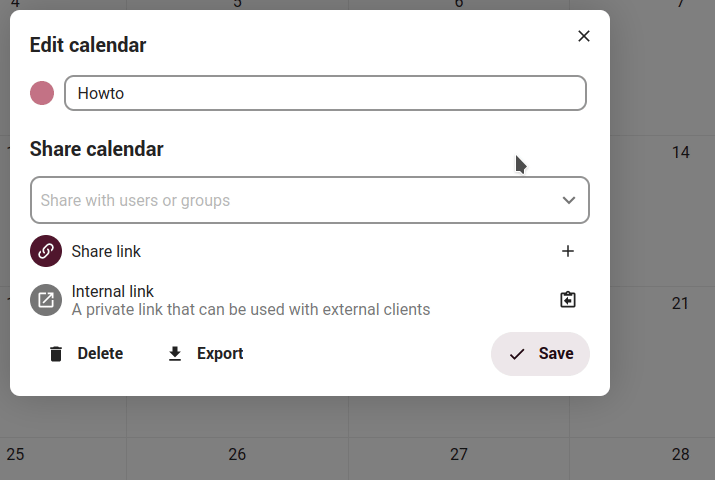
- First, we click on the + (plus) icon in the Share link option;
- this action will generate a public link we can copy (and share it the way we want) and a three-dots menu where we can choose to send it via email (we just need to type the email address and press Enter).
- We can also embed the shared calendar into public pages via HTML code by clicking on the option [ ] Copy embedding code. On the public pages, users are able to get the subscription link for the calendar and export the whole calendar directly.
- We can also share an Internal link that can be used with external clients.
In all of these cases, the calendars will be read-only.
Now, to share a calendar with another users or groups we open the calendar edition options and in the Share calendar field we enter the user o group name.
Once shared we can enable the user or group editing permissions.
Last options we have here are Delete the calendar or Export it as an .ics file.
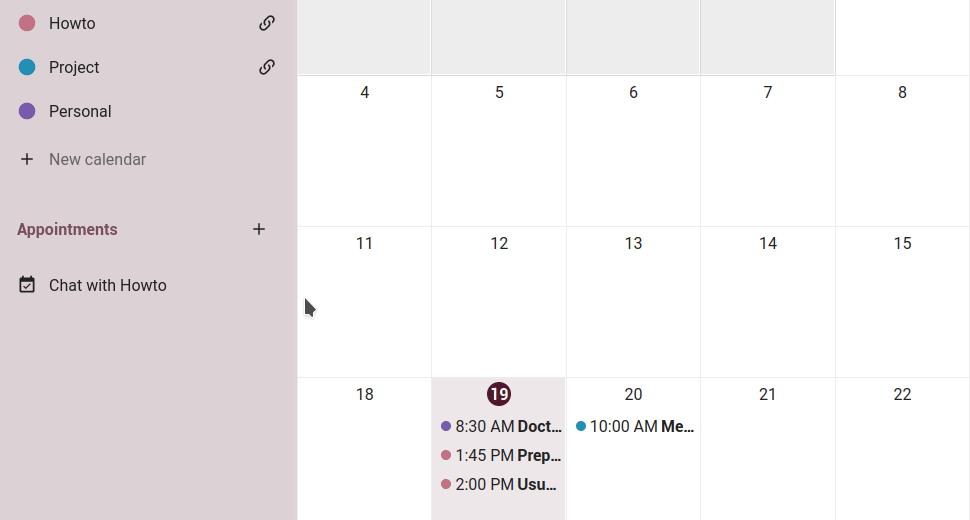
Appointments
The calendar app can generate appointment slots which other cloud users and also people without an account on the instance can book. Appointments offer fine-granular control over when we are possibly free to meet up. This can eliminate the need to send emails back and forth to settle on a date and time.
Creating an appointment
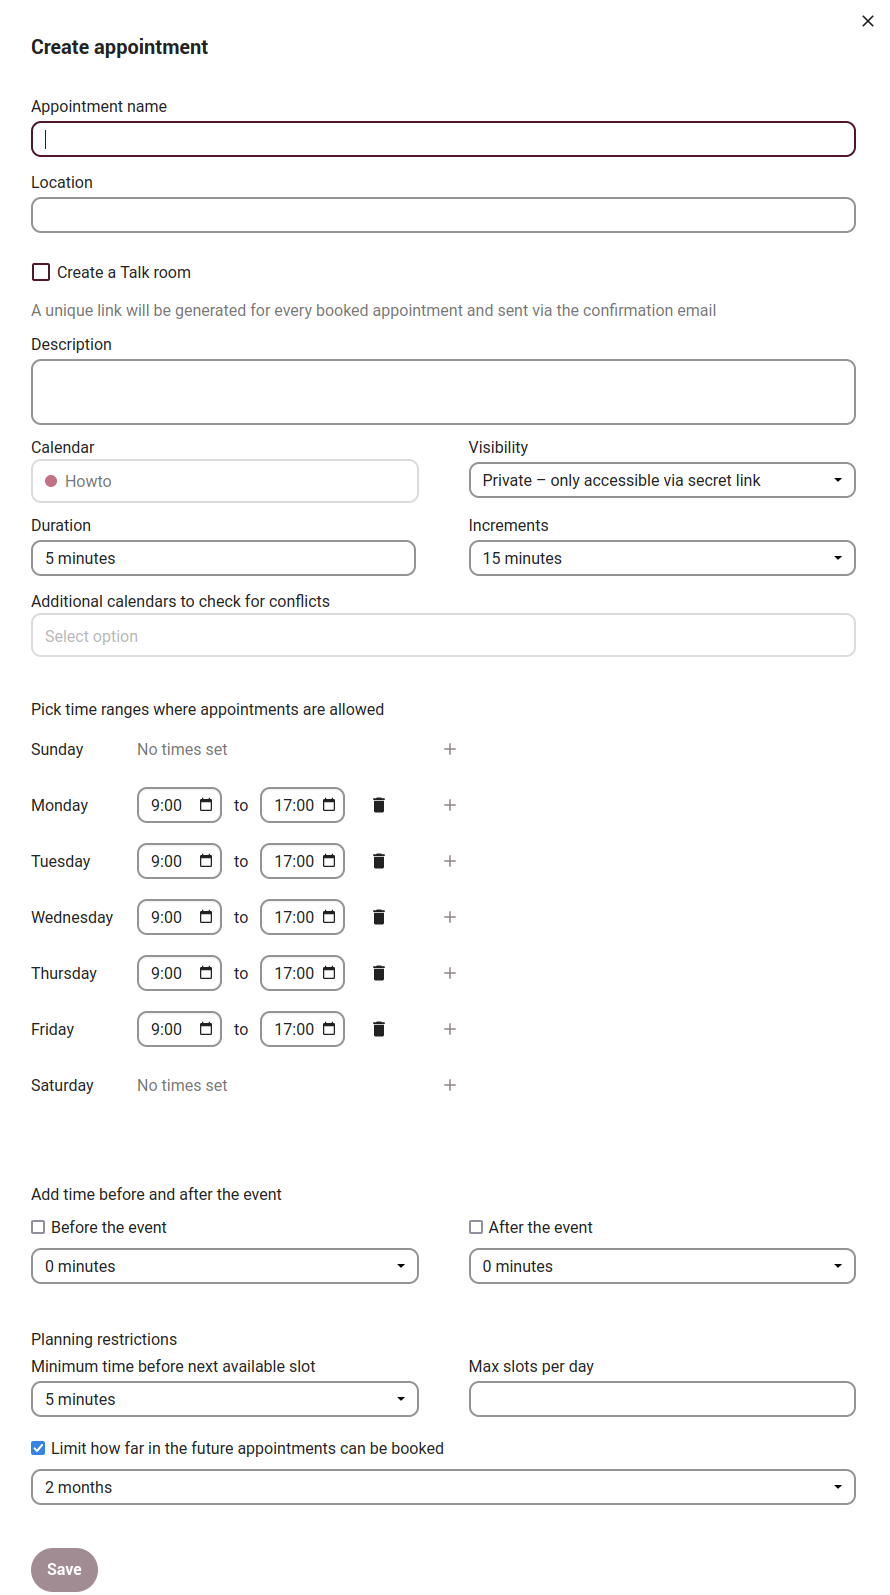
We click on Appointments in the left sidebar and the dialog to create a new appointment will open.
Here we need
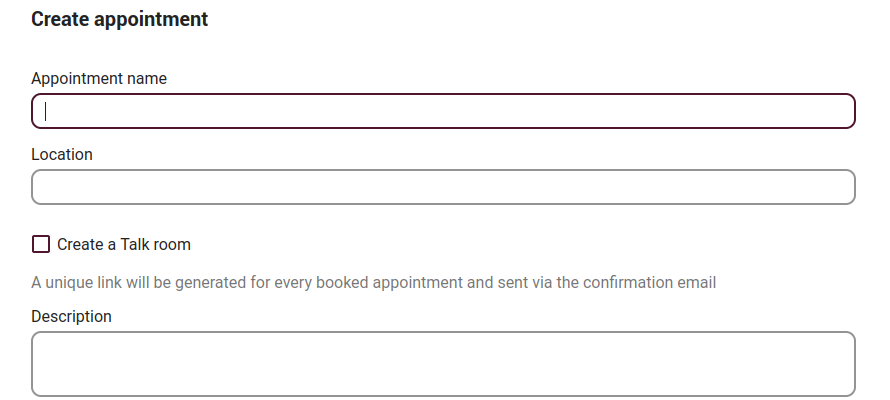
- to complete the Appointment name;
- its Location;
- indicate if we want a Talk room to be created for this purpose;
-
and optionally add an event description so attendees can know a little more about it.
In the next section of the Appointment options
-
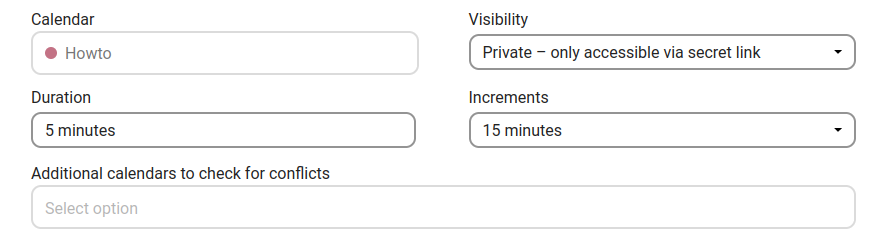
we can choose to which Calendar the appointment belongs to;
-
set the Duration of the appointment, that can be picked from the predefined list;
-
set the Visibility, that is if the appointments will be Public (meaning that it can be discovered through the profile page of a cloud user) or Private (only accessible to the people who receive the secret URL);
-
set the Increments, that is the rate at which possible slots are available. For example, we could have one hour long slots, but we give them away at 30 minute increments so an attendee can book at 9:00AM but also at 9:30AM; and
-
add a calendar to check for conflicts, so only slots that do not conflict with existing events in our calendars will be shown to attendees.
-
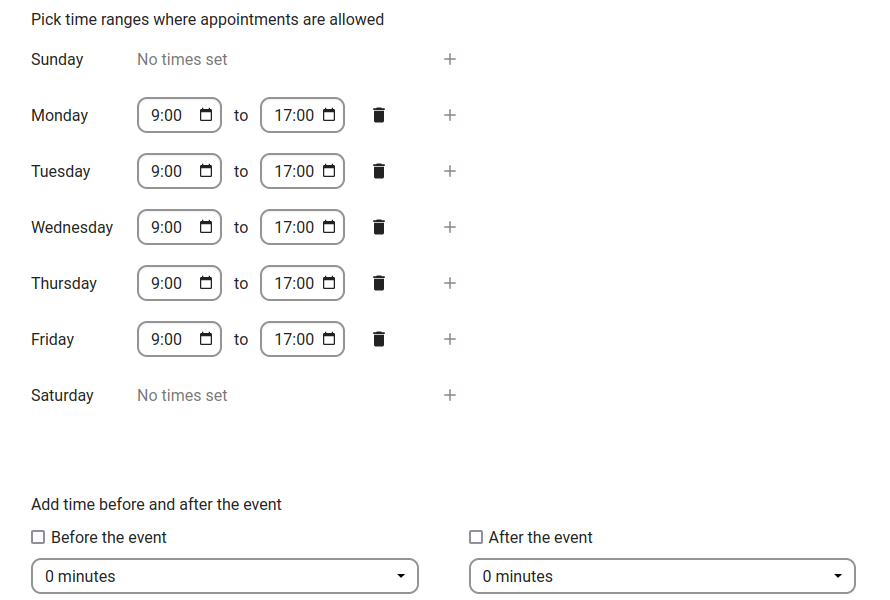
Next is to set the time ranges. As organizers of an appointment, we can specify at which times of the week it is generally possible to book a slot. This could be the working hours but also any other customized schedule.
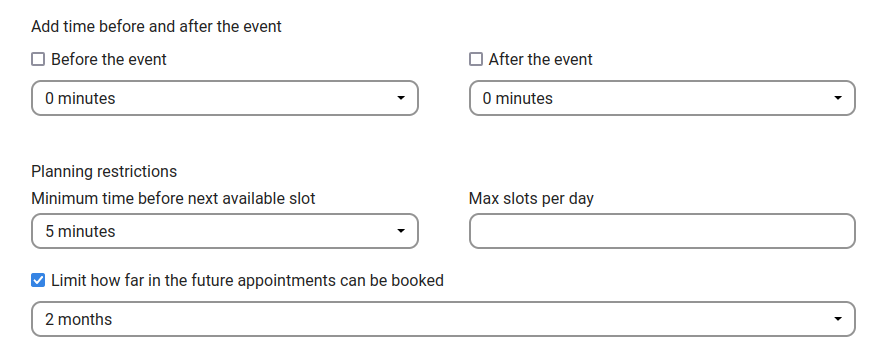
- If some appointments require time to be prepared, we can chose to select a time duration that must be free. Only slots that do not conflict with other events during the preparation time will be available. Moreover there is the option to specify a time after each appointment that has to be free.
-
Finally, we have the Planning restrictions. It is used to prevent an attendee from booking too short notice. Here we can configure how soon the next possible appointment might take place. Setting a maximum number of slots per day can limit how many appointments are possibly booked by attendees.
Once we are done, we click on Save.

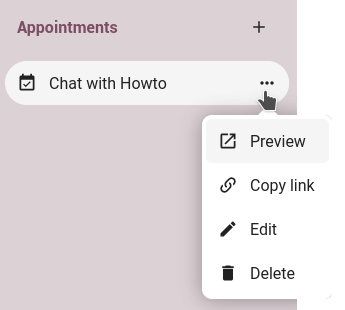
We can preview the appointment or copy the link to it and share it with our target attendees, or let them discover our public appointment through the profile page. We can also access to these options from the side panel where the configured appointments will be listed.
Booking an appointment
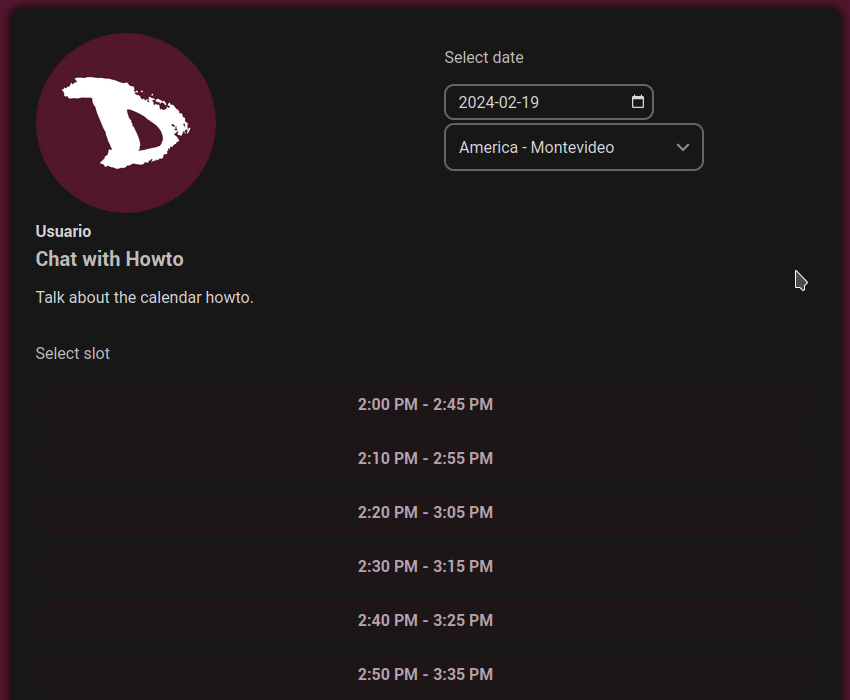
The booking page shows an attendee the title, location, description and length of an appointment.
For a selected day there will be a list with all the possible time slots. On days with no available slots, too many conflicts or a reached daily maximum limit of already booked appointments, the list might be empty.
For the booking, attendees have to enter a name and an email address. Optionally they can also add a comment.
When the booking was successful, a confirmation dialogue will be shown to the attendee.
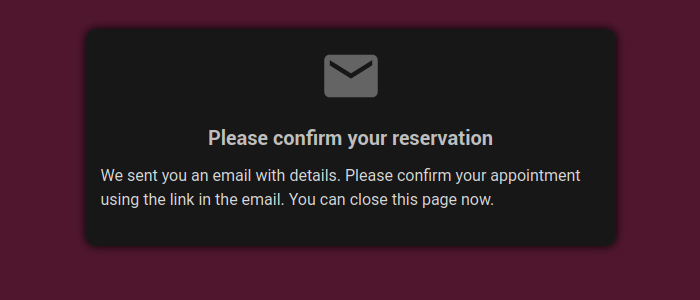
To verify that the attendee email address is valid, a confirmation email will be sent to them.
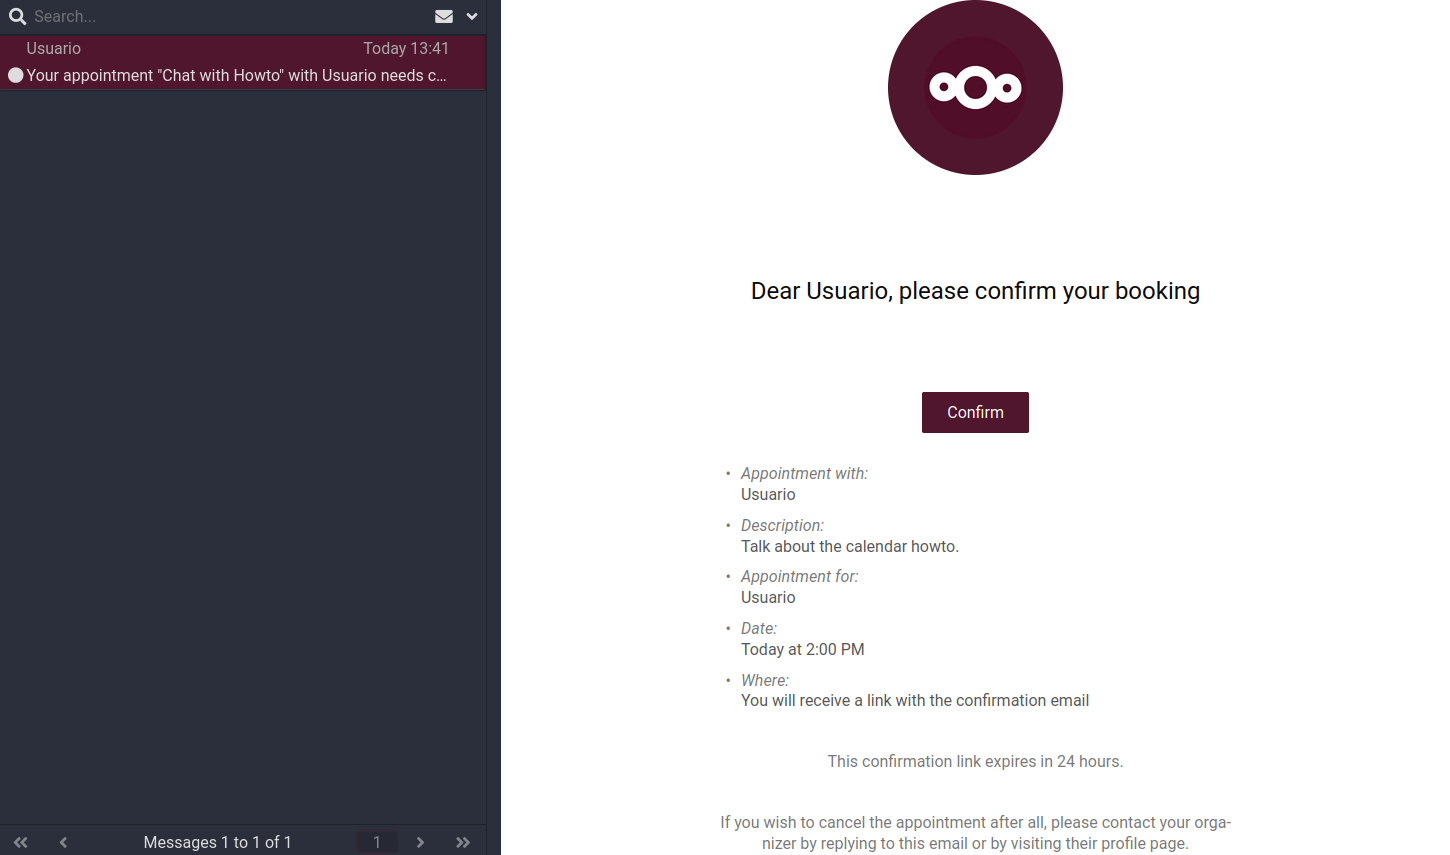
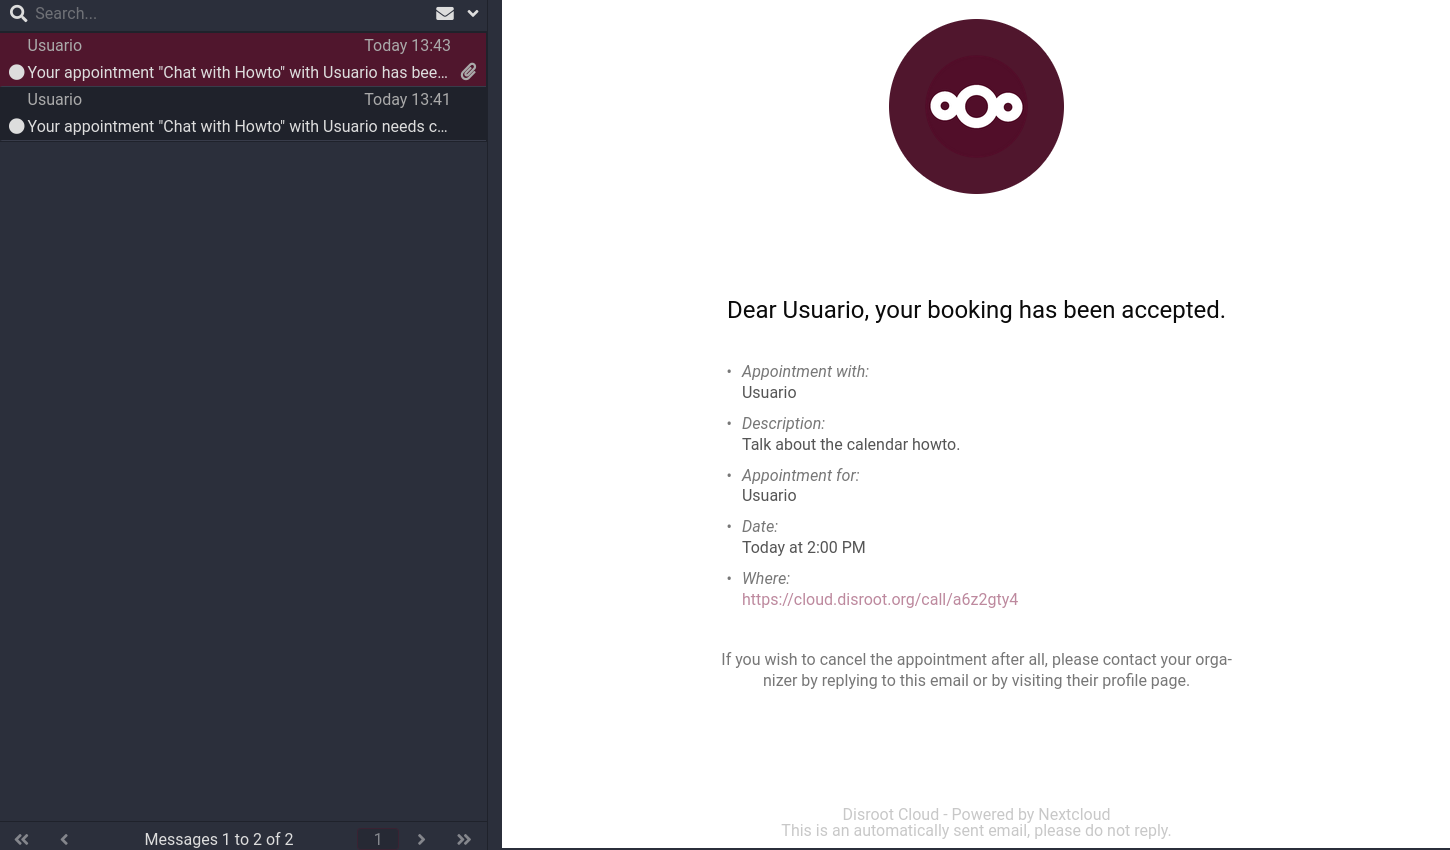
Only after the attendee clicks the confirmation link from the email the appointment booking will be accepted and forwarded to us.
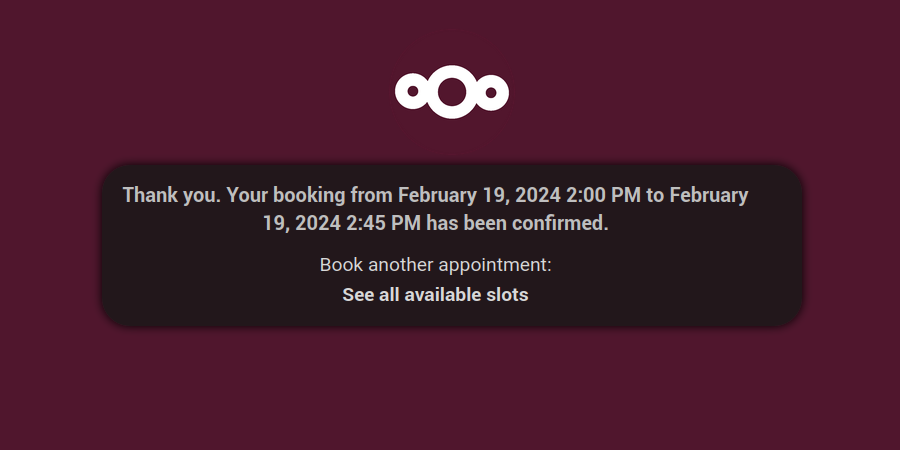
The attendee will receive another email confirming the details of their appointment.
If a slot has not been confirmed, it will still show up as bookable. Until then the time slot might also be booked by another user who confirms their booking earlier. The system will detect the conflict and offer to pick a new time slot.
Once the booking is done, we will find an event in our calendar with the appointment details and the attendee.
As with any other event that has attendees, changes and cancellations will trigger a notification to the attendee’s email.
If attendees wish to cancel the appointment they have to get in contact with us, so that we can cancel or even delete the event.
Calendar app clients
There are also desktop and mobile clients for the cloud Calendar app. To learn how to configure and use them, we can read the following tutorials.
